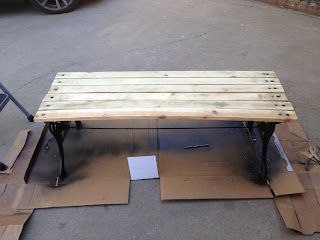
Back story: This bench is courtesy of my FRIEND and co-worker. She was giving me something else, when she low key mentioned the bench. When I saw it, I saw the possibility of what this bench could become. I have an intense loathe when paint is put on wood. Wood is such a natural creation and I don’t comprehend painting it when you can stain it and keep the natural look of the wood. I understand this is my hang-up and if there was the wood form of PITA…. I would be ALL IN!!! SAVE THE WOOD!!!!
SO…. I WAS going to paint this bench the color of my house. Seemed like a simple project. Primer then paint. However when I finally sat down and evaluated the bench, I realized…. this is real WOOD…WTH??!!?? DID my beloved friend…. and coworker do the one thing to wood I HATE…she PAINTED IT??!!?? REAL WOOD!!! I assumed it was that press wood crap BUT NO…this is real wood. At this point the project got much bigger.
I broke out my palm sander. Keep in mind the last time I used my palm sander was over 5 years ago. Good thing is, I had plenty of extra tough removal sand sheets. I began to take of what appeared to be layers of green paint. NEEDLESS to say, after 3 sheets and only two wood planks, I had to go to my favorite place on earth….HOME DEPOT. The paint was too thick. At the rate I was going with my beloved palm sander…it was turning into about a week project. Unfortunately, I didn’t have this kinda time…I had 1 ½ day.
Side note: I am the owner of a drill. Let me say, if you own a house, a drill is a must in your tool kit…. I am fortunate to have two drills. One my husband bought and the other is my stepfather…God rests his soul.
When I got to Home Depot, low and behold…. they had an extension to my drill to turn it into a sander. Now, you people who pay people might not understand the power of the drill so let me break it down. The power of the drill turned into a sander would cut my time down by an easy week and for $7.49????… I WAS GAME!!!
I came home and broke the bench down, removed the screws and took the paint off all the planks. Max time was bout 1 hour. I re-spray painted the legs to a satin black.
It was during this time, I realized the bench was not straight due to a bend in a metal thingy (don’t know the official name….I am girl…give me a break) holding them together. In my attempt to straighten it out…the damn metal thingy broke! For the record, I yelled a really good curse word that I wont repeat here.
Being a girl who is quick on her feet, I figured out how to fix the problem BUT this made the bench shorter….Yes…at this point I yelled the word again…and yes it started with a F. all imma say.
ANYWHO….. I drilled new holes but this created another problem…what to do with these double holes ???
Well….I cut the excess off with my trusty hack saw. WHAT??? Everyone has a hacksaw…right???
Made them even with the sander then re- sanded them with fine sand paper.
And began the staining process.
NOW when staining wood, you must put a layer of stain then wipe off with a cotton item.I like to do this as I go on the first coat so that each area has the same level of staining.
As a final coat….I put a thick layer of stain and let sit for bout all of 2 minutes then wipe
Waaa-laaa….I have achieved the color of the wood I want.
What happened to that side I had to fix ??? well take a look. Can’t even tell can ya ?? I know…. I know…I am good. No need to tell me because I know.
OH…here is Charli…she got bored watching and sniffing my project. So she chilled in the background.
A final clear coat to protect the wood and I am done. I like my wood stain to sit for at least 24 hours. Right now I don’t have the final look but know that what you see is pretty much it….I don’t do shiny stuff so it will look like you see it now with a light sheen. If you follow me on Instagram at delebygoss, you will definitely see it there.


AWESOME!!! Have I told you lately how BOMB.COM you are!!!! You make it happen honey! and I love it!!!
ReplyDelete